Autometer Tach Install How-To
This particular how-to is written for the Autometer Mini Tachometers 2305 and 2306. However, it should be helpful for all Autometer (and maybe others) gauges, as many of the wires would hook the same place, no matter what the gauge is.
This how-to assumes that you already have the tach mounted and have the wires feed down behind the driver's side kick panel, right behind the steering wheel column. Make sure this is done, and the panel itself is removed, so that you can see all those intimidating bundles of wires! Let's get started!
A most valuable device is a multimeter. You can test your connections and check what the voltage is going through a wire, and when that voltage is there (when the car is off, only when the car is running, only when the lights are on, etc.)
HINT: The best way to test a wire is to stick a regular sewing pin into the wire. Then take the multimeter and put the positive terminal on the pin and the negative on a ground. You can take the pin out and the wire will, over time, reseal itself.
 The first thing that you probably want to do is remove fuse number 34. This turns off the courtesy lights, making it easier to see into the well and also making it less likely that you take a layer of skin off on that very hot bulb. Unfortunatly, it took me a while to realize that it would be good to do this . . .
Here is a general overview of the locations that we will be dealing with. More detailed pictures are below.
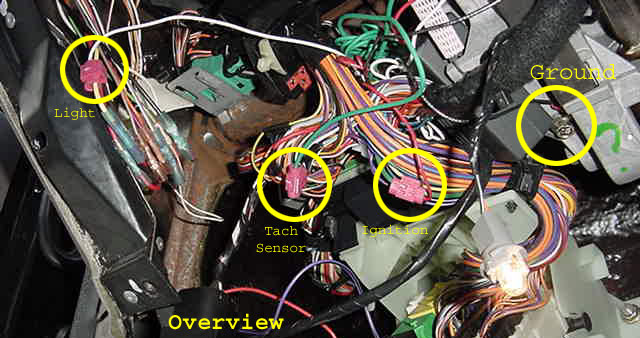
The first wire that you will probably want to hook up is the ground wire. A wire is grounded most easily by attaching it to a screw that is also grounded. The one I choose is located almost directly behind the steering wheel.

(Yes, that is a question mark drawn on the frame. I guess Ford didn't know what it was at the time.) I connected it using a spade terminal bought from Home Depot. As you can see, I didn't get it quite big enough to fit around the shaft, but I don't think it's going anywhere.
The next wire is for the tachometer's light. The wire needs to be on a circuit that has 12V only when the parking or driving lights are on. The particular wire is located on the very left, right below the light switch.


BE CAREFUL! The wire may not be yellow on your car! TEST IT FIRST! On another car the wire was white.
To splice the wires together I used a small wire splice also bought at Home Depot. You can do it by soldering, but these are much, much easier. Once you get the light wire and white wire from the tach together, go ahead and switch on your parking lights. The tachometer light should come on also. If not, recheck the spliced wire and the ground.
Next comes the ignition wire. I don't know why Autometer calls it an ignition wire. What they are really looking for is a 12V power source that is only active when the car is on. The wire I found is among the main bundle, and is a dark green.
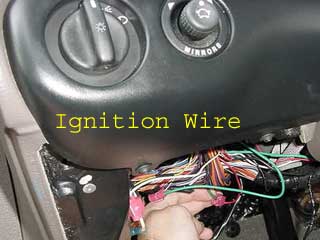

After checking it with the pin for 12V only when the car is running (or in the on position), go ahead and splice the red wire from the tach to it. If the tach was sitting at any other number than zero, then you should be able to start the car and the needle should drop to zero. If it doesn't move (i.e. stays at 2000 RPM) recheck the connections.
Last comes the wire that makes it all happen: the tach sensor wire. Since the Contour has no stardard ignition coil, the tach must be attached to the existing tach wire, which is there if you have a tach in the instrument cluster or not. The wire is white with a black strip, but there is at least three of these close to each other. Luckily, the one we want seems to be the smallest one, and is coming off a green wiring harness right about the fuses.
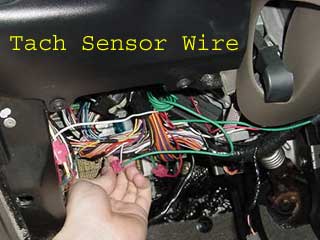

Once you find it, stick a pin into and wrap the bare wire from the green tachometer wire around it, then turn on the car. You could go ahead and splice, but since there are multiple white/black wires, a simple test may save you time. If the tach works, then splice permanetly and enjoy!